
How to Fix Common Carpet Installation Problems

Carpet can add beauty, warmth, and comfort to any home. A neat floor surface creates a soft feel for daily walking comfort. Yet many homeowners run into common problems when installing carpet. This is why knowing solutions can save money and reduce stress. Whether you try DIY carpet installation or plan carefully, challenges may happen. Wrinkles, uneven seams, or loose corners can appear later. Before rushing to replace, you can often handle issues with knowledge. With the right carpet installation process, problems become manageable and easier. Learning how to handle issues also helps you extend carpet life longer. Good carpet installation preparation is the key to preventing future flooring issues. Wrinkles and Ripples in Carpet Wrinkles or ripples are the most common carpet installation problems people face. They often appear when carpet is not stretched tightly during fitting. Installing carpet requires careful use of stretching tools to hold firm. Without proper stretching, foot traffic causes bubbles and folds to appear. This problem is managed by re-stretching the carpet using correct equipment. Some people try DIY carpet installation with patience and basic rental tools. The carpet installation process becomes smoother when padding is fitted correctly first. Wrinkle control is easier if you do not delay handling the issues. Early carpet installation preparation prevents future bumps or surface movement after regular use. Seam Splitting and Visible Joins Another problem many people face is seam splitting or visible joins. When installing carpet, seams must be joined using heat and seam tape. If not done right, lines show and affect the finished look. Matching carpet fibers carefully is important when cutting and placing seams. DIY carpet installation requires extra patience when trimming and aligning edges. If you notice open seams, sealing them early can reduce spreading. Carpet installation preparation helps by planning where seams will fall inside rooms. For larger areas, careful measurement ensures seams are less visible overall. Correct seam handling keeps the carpet surface smooth and appealing after installation. With good planning, the carpet installation process avoids visible and uneven gaps. Loose Edges and Corners Loose edges and frayed corners are common in residential carpet installation. These issues appear when tack strips are not secured firmly to the floor. Installing carpet means anchoring every edge tightly against the wall or step. A loose edge allows dirt to collect and shortens carpet life greatly. To handle this, tack strips must be placed carefully at correct spacing. DIY carpet installation methods include using a carpet kicker along the wall. Always begin with clean and level floor surfaces during carpet installation preparation. Proper edge fixing prevents peeling and improves the overall appearance of flooring. Tight carpet edges hold shape and protect fibers from everyday household wear. Doorway Transition Issues Sometimes carpets lift up at doorway transitions creating tripping hazards quickly. This usually happens when installing carpet without a strong threshold strip installed. Threshold strips or transition bars keep the carpet locked firmly in place. During the carpet installation process, these strips are pressed between flooring types. Without this step, edges between carpet and tile can shift over time. DIY carpet installation requires measuring the doorway width and fitting the strip. Carpet installation preparation ensures correct placement at all entry points before stretching. Fixing this problem quickly prevents damage and keeps the surface safe to walk. A neat transition line improves both the look and the safety instantly. FAQs How to install carpeting?To install carpeting, prepare the floor, place padding, stretch carpet, trim edges, and secure seams carefully. How to install carpet on steps?Measure each step, cut carpet pieces, use tack strips, staple securely, and smooth out wrinkles. Should I tip carpet installers?Tipping is not required but appreciated for good work, usually ten to twenty dollars. Can you install carpet over tile?Yes, you can install carpet over tile if the surface is clean, level, and well prepared. What is the carpet installation process?It includes preparation, padding placement, stretching, seam sealing, trimming, and final edge securing. Uneven Surfaces and Bumps Some homeowners complain about uneven surfaces or bumps after installing carpet. This problem often comes from poor padding placement or floor leveling. The carpet installation process requires smooth padding across the entire floor area. If padding overlaps or shifts, bumps appear under the carpet surface. Taking time to glue or tape padding edges avoids unwanted movement. DIY carpet installation mistakes often involve rushing the padding placement steps. To handle bumps, lift sections and reset padding for even coverage. Carpet installation preparation includes cleaning the subfloor and checking for cracks first. A clean and level surface ensures the carpet stays smooth for years. When planning your project, always compare materials and request a free estimate before starting. Handling bumps early helps you avoid replacing expensive flooring before necessary.
Personalize Your Space with Unique Flooring Patterns
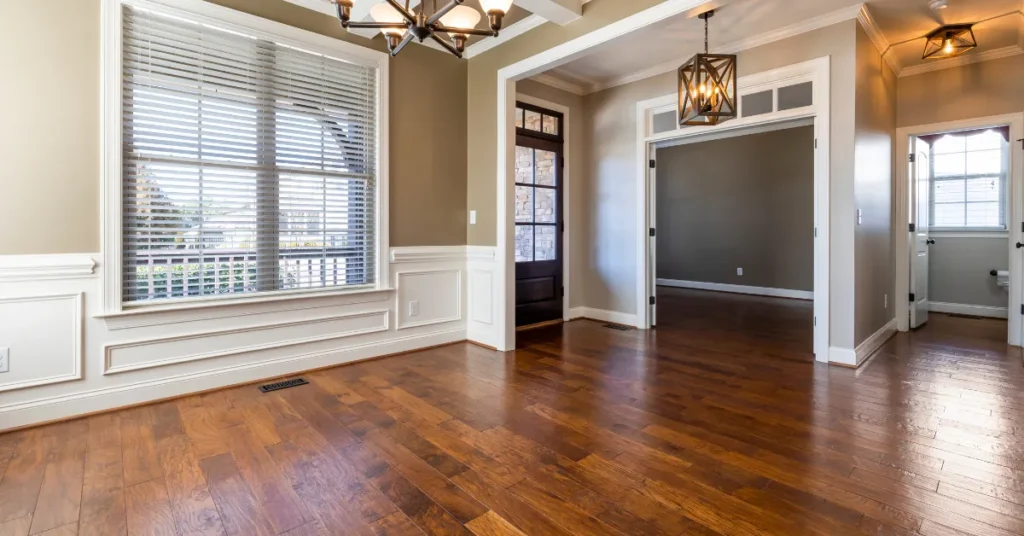
Creating a home that reflects your personality starts with flooring choices. Choosing the right floor pattern can dramatically transform any space, adding style and warmth effortlessly. From bold geometric shapes to subtle wood textures, every design communicates a unique story. Homeowners today prefer customizing their spaces to stand out rather than follow standard trends. Flooring plays a central role in creating this distinction, offering options for different rooms and lifestyles. Whether installing hardwood, vinyl, or tile, selecting the correct flooring pattern ensures longevity and aesthetic appeal. Professional flooring contractors in Santa Fe can guide you in choosing the best material and design combination. Timber Floor Patterns for Style and Warmth Timber floors provide an excellent foundation for various interior styles. A well-chosen timber floor pattern enhances natural wood grain while adding visual interest to rooms. Designers often recommend mixing plank sizes or herringbone designs for unique aesthetics. Hardwood materials create warmth and durability, making them perfect for high-traffic areas. In addition, pairing hardwood flooring installation with matching trims improves room cohesiveness. Some homeowners combine timber with rugs to protect surfaces while adding texture. Regular maintenance, including using a proper carpet cleaning solution on adjacent carpets, ensures all surfaces remain spotless. Expert contractors ensure your timber layout flows naturally with room dimensions and lighting. Timeless Wood Floor Patterns Wood floors remain a timeless choice for modern and classic interiors. Selecting a wood floor pattern allows customization, whether traditional straight planks or chevron designs. Wood flooring is versatile and complements various furniture styles, colors, and wall textures. Incorporating underfloor heating or durable finishes enhances functionality without compromising beauty. Installation quality impacts longevity, making professional flooring contractors in Santa Fe essential for flawless results. Combining wood patterns with proper maintenance extends life and appearance. Routine cleaning with gentle solutions and polishing ensures consistent shine. Unique wood floor patterns give a room personality, offering an inviting and stylish ambiance that impresses visitors immediately. Vinyl Flooring Patterns for Practical Beauty Vinyl flooring offers practical benefits for families and busy households. Modern vinyl mimics natural textures, giving homeowners luxury without high costs. Creative flooring patterns like checkerboard, geometric, or plank designs make vinyl visually appealing. Professional vinyl flooring installation ensures smooth edges, long-term durability, and moisture resistance. Vinyl is perfect for kitchens, bathrooms, and utility rooms where spills are frequent. Pairing vinyl with other materials, like timber or tile, creates distinctive and cohesive designs. Regular maintenance using recommended cleaning solutions keeps the surface bright and attractive. Installing vinyl allows for flexibility in pattern selection, enabling homeowners to experiment with bold combinations without worrying about damage or difficult repairs. Tile Flooring Patterns for Durability and Style Tile provides durability and endless creative options for homes. A custom flooring pattern with tile transforms bathrooms, kitchens, and living areas elegantly. Tile allows geometric arrangements, mosaics, or contrasting colors to highlight a room’s character. Professional tile flooring installation ensures perfect alignment, preventing uneven surfaces or gaps. Tiles are highly resistant to moisture, stains, and scratches, making them ideal for high-traffic spaces. Pairing tile with proper carpet installation services in nearby rooms maintains a balanced, stylish look throughout the home. Regular cleaning with gentle solutions keeps tiles sparkling and prevents discoloration. Tile patterns can be combined with wood or vinyl sections to achieve a seamless, artistic effect. Frequently Asked Questions 1. What is a floor pattern and why is it important?A floor pattern is the arrangement of flooring materials, creating style, ambiance, and visual interest. 2. Can I combine different flooring patterns in one room?Yes, combining wood, tile, or vinyl patterns enhances creativity and personalized home style. 3. How do I maintain a unique wood floor pattern?Regular cleaning with a proper solution and periodic polishing preserves its texture. 4. Should I hire professionals for custom flooring designs?Yes, professional flooring contractors in Santa Fe ensure perfect installation and durability. 5. What flooring type is best for high-traffic areas?Tile and vinyl are durable options, while hardwood works with proper maintenance. Custom Flooring Designs for Personalized Spaces Custom flooring designs elevate any residential or commercial space. Homeowners seeking individuality often request unique flooring patterns tailored to their personal taste. Experts in custom flooring designs work with clients to blend materials, colors, and textures harmoniously. Pattern selection is influenced by furniture, lighting, room shape, and lifestyle needs. Professionals also provide hardwood, vinyl, and tile flooring installation to execute designs flawlessly. Regular upkeep, including proper carpet cleaning solution and surface care, ensures long-lasting beauty. Custom designs allow the combination of durability, aesthetics, and functionality in every room. To discuss your ideas or get started, Contact Us for expert guidance and personalized solutions. This approach transforms ordinary spaces into environments reflecting style, sophistication, and comfort.
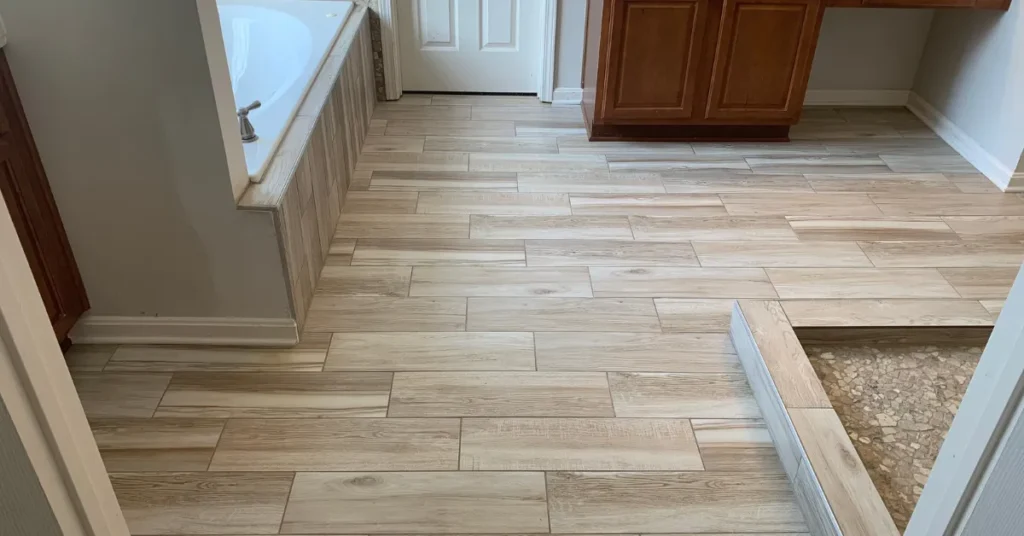
How to Install Hardwood Floors on Concrete
If you’re asking, Can you install hardwood floors over concrete? the answer is yes! Many homeowners often wonder if it’s possible to install hardwood floors on concrete, and fortunately, it is. Whether you’re renovating a basement, living room, or other areas with concrete subfloors, hardwood floors can still be installed. However, it requires proper preparation and understanding of the process to ensure a successful and long-lasting result. This blog will walk you through the essential steps to install hardwood floors on concrete and discuss what you need to consider before beginning the project. Preparing Your Concrete Subfloor for Hardwood Installation When installing hardwood floors over concrete, the first thing you need to do is assess the condition of the concrete subfloor. Can you install hardwood floors over concrete? The answer is yes, but only if the concrete is in good condition. Concrete can be uneven, cracked, or have moisture issues that need to be addressed before you begin the hardwood floor installation. Without proper preparation, your hardwood floors may warp, shift, or even get damaged over time. It’s important to inspect the concrete thoroughly for cracks or signs of moisture, as these issues could compromise the integrity of the flooring. If you find any issues, you may need to repair the cracks and apply a moisture barrier before starting the installation. By doing this, you’re ensuring a smooth, stable foundation for your hardwood floor installation. Choosing the Right Installation Method Before diving into the installation, one of the most critical steps is choosing the right method of installation. Typically, there are three ways to install hardwood floors on concrete: nail-down, glue-down, and floating installation. Can you install hardwood floors over concrete? The answer is yes, and each method has its advantages, suited for different types of wood and concrete conditions. The nail-down method requires a wooden subfloor beneath the concrete, while the glue-down method uses an adhesive to attach the hardwood directly to the concrete. If you’re unsure about the best method for your project, THE CARPET MAN offers expert guidance and professional installation services. Floating installation, the most common method, involves the hardwood planks clicking together without being nailed or glued down. This method is particularly popular because it is easier and faster. However, depending on your subfloor, some methods may be more suitable for the installation. Addressing Moisture Issues One of the most common concerns when installing hardwood floors on concrete is moisture. Can you install hardwood floors over concrete? Yes, but concrete is naturally porous, meaning it can absorb moisture from the ground, which can lead to moisture problems in your flooring over time. To address this, it is essential to install a moisture barrier before laying down the hardwood floor. A moisture barrier will prevent any water vapor from seeping into the wood, which could cause warping, swelling, or mold growth. Many experts recommend using a plastic sheet or specialized underlayment designed to create an effective moisture barrier between the concrete and hardwood floor. Installing Hardwood Floors on Concrete Once you’ve prepared the concrete subfloor and applied the moisture barrier, it’s time to install the hardwood flooring. Can you install hardwood floors over concrete? Yes, you can, and if you’re using a floating floor system, you’ll need to lay down an underlayment before installing the hardwood planks. The underlayment serves as a cushioning layer that absorbs sound and helps with insulation. If you’ve opted for the glue-down or nail-down method, follow the manufacturer’s instructions for applying the adhesive or securing the nails. When laying the planks, make sure to leave a small expansion gap around the edges of the room to allow the wood to expand and contract naturally with changes in temperature and humidity. This step is crucial to ensure your floors last a long time without buckling or shifting. Acclimating Your Hardwood Floors After installing the hardwood floors, be sure to let the planks acclimate to the room’s temperature and humidity for at least 48 hours before walking on them. Can you install hardwood floors over concrete? Yes, and once installed, this acclimation period helps the wood adjust to its environment, preventing potential issues like warping or gapping. Additionally, once the floor is fully installed, you may need to apply a finish to protect the wood from daily wear and tear. Some hardwood floors come pre-finished, while others may require a coat of polyurethane or another finish to enhance their durability and appearance. Hiring Professional Flooring Installation Services When deciding to install hardwood floors on concrete, you should also consider the benefits of professional flooring installation services. While DIY installation is an option for some, hiring experts can ensure that the process is done correctly and efficiently. Professional wood and laminate flooring installation services have the experience and tools to handle various subfloor conditions, ensuring the proper preparation and installation techniques. This can save you time, effort, and potential mistakes, especially when dealing with concrete surfaces that require extra attention. Frequently Asked Questions (FAQs) 1. Can you install hardwood floors over concrete in a basement?Yes, but ensure you apply a moisture barrier and check for dryness before installation. 2. What is the best method for installing hardwood floors over concrete?The floating method is easiest, but glue-down may be better for humid areas. 3. Do I need a moisture barrier when installing hardwood floors over concrete?Yes, a moisture barrier is essential to protect the wood from moisture damage. 4. How long does it take to install hardwood floors on concrete?It typically takes 2-5 days, depending on the area size and installation method.5. Can I install hardwood floors over existing concrete floors without removing them? Conclusion The decision to install hardwood floors over concrete is a fantastic way to elevate the look and feel of your space. Hardwood flooring is known for its timeless appeal, durability, and ability to increase the value of a home. Whether you’re working with concrete in a basement, a living area, or a commercial property, this flooring solution offers both
Vinyl Flooring Installation in Santa Fe | Stylish, Durable Home Upgrades
Vinyl flooring is becoming one of the most popular choices in homes across Santa Fe. Homeowners love its easy care and modern look that suits every lifestyle. When you want style without the heavy price tag vinyl floors are perfect. Many people search for trusted Vinyl Flooring Installation Services that deliver long term value. The right installation service helps you enjoy strong and attractive flooring. With many designs available you can always find something that fits your taste. If you are thinking about a flooring upgrade then vinyl is worth it. Today we will talk about luxury vinyl tile flooring installation and why it matters most. It is a simple way to get beauty durability and comfort underfoot. Benefits of Luxury Vinyl Tile Flooring Installation Luxury vinyl tile flooring installation is not only about better looks but also about strength and comfort. This option gives you the style of hardwood or stone without heavy costs. Families love it because it stands up against daily traffic and busy life. It is also water resistant which makes it great for kitchens or baths. If you are learning how to install luxury vinyl flooring you should know the steps. It starts with preparing the floor surface to make sure it is level and clean. Next the tiles are laid in a planned pattern for a natural finish. The process is easier compared to hardwood floor installation but still needs skill. Hiring a professional installer makes the job smooth fast and long lasting. That is why choosing expert Vinyl Flooring Installation Services in Santa Fe is so important. Comparing Vinyl Flooring with Hardwood Installation When planning your Santa Fe vinyl flooring installation it helps to compare all options. Luxury vinyl comes in planks and tiles both giving a modern look and style. The surface is made strong with layers that protect from scratches and stains. Many homeowners also choose it because it reduces noise inside the living space. Unlike traditional hardwood floor installation this material does not warp with moisture or weather. The variety of colors and textures makes it perfect for every design style. Choose from rustic colors to modern sleek finishes to match your taste. Some even prefer stone inspired designs that bring a luxury look without cost. With professional Vinyl Flooring Installation Services your home gains value and comfort. It is an easy way to refresh your living room kitchen or bedrooms. Why Santa Fe Homeowners Choose Luxury Vinyl Santa Fe is a place where people value both style and practicality in home design. That is why luxury vinyl tile flooring installation has become a leading choice today. You can enjoy the beauty of real hardwood floors with easier care and cleaning. The surface is soft underfoot which makes it comfortable for families and kids. Those who want to know how to install luxury vinyl flooring must prepare first. Clean and dry surfaces are the base of a strong and lasting installation. Experts carefully measure and cut each piece to ensure a precise, smooth fit. With this method you avoid gaps or weak spots that reduce the life of floors. Unlike hardwood floor installation there is no heavy sanding or sealing required. This makes vinyl flooring a smart choice for both new homes and remodels. Professional Vinyl Flooring Installation Services Vinyl Flooring Installation Services in Santa Fe provide full support from start to finish. They help you pick designs that match your style and home setting. Once you select the look professionals handle every step of installation with care. The process is safe and leaves your home ready for daily living right away. Choosing luxury vinyl tile flooring installation means you are making a smart investment. Floors are designed to handle spills scratches and heavy use with no issues. That makes them perfect for both family homes and busy commercial spaces. Experts install luxury vinyl flooring efficiently and with precise accuracy. The results are smooth elegant and ready to last for many long years. A trusted company ensures your new flooring will bring lasting beauty and value. Final Thoughts on Vinyl Flooring Installation in Santa Fe When it comes to flooring choices you want something that mixes style with durability. Vinyl flooring offers the beauty of hardwood without the high price. Families across Santa Fe are moving to luxury vinyl tile flooring installation every day. The reason is clear as it provides beauty comfort and long lasting performance. You can avoid the tough work that comes with hardwood floor installation. Instead you get a clean finish that holds up against spills and daily wear. Expert Vinyl Flooring Installation Services give you peace of mind from start to end. They know how to install luxury vinyl flooring the right way every time. Best of all, many providers offer a free estimate so you can plan your project easily. In the end your Santa Fe home gains style comfort and added property value. If you want lasting floors then vinyl is the best choice for you today.
Hardwood Flooring | Installation Techniques for Perfect Floors

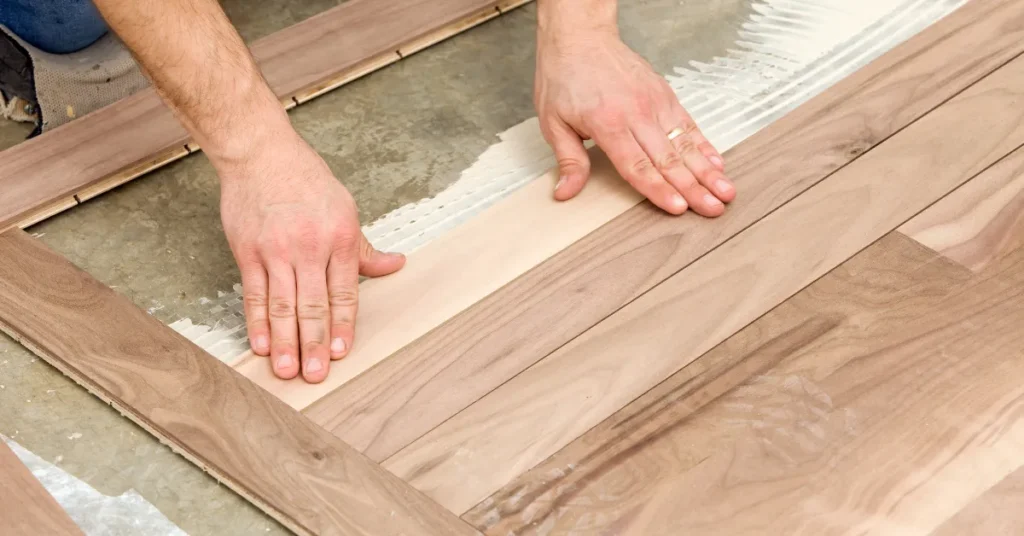
Hardwood floors add lasting elegance and warmth to any home’s interior. Many homeowners ask, how do I install hardwood floors safely and efficiently? Installing hardwood requires careful planning and preparation before laying down the planks. Choosing the right type of wood, such as solid or engineered, ensures durability and long-lasting appeal. Proper subfloor preparation prevents uneven surfaces and future issues with the flooring. Homeowners must also consider moisture levels to avoid warping or gaps. With the right tools and techniques, anyone can achieve a professional-looking finish in their living space. Following guidelines reduces mistakes during flooring installation services. Planning and Preparing Your Space Before starting, measure the room accurately to determine the number of planks required. Marking the layout helps prevent uneven cuts and awkward joints later. Many homeowners ask, how do I install hardwood floors safely over existing surfaces, including tile? With proper underlayment and adhesive, this approach is possible. Removing baseboards is necessary for seamless installation and allows expansion gaps at the edges. A flooring nailer or stapler keeps the planks firmly in place without causing damage. Hardwood floor installation patterns, such as herringbone or straight lay, add aesthetic value. Planning the pattern in advance ensures a consistent and visually appealing design throughout. Engineered Hardwood Flooring Installation Techniques Engineered hardwood flooring installation is a popular choice due to stability and easier maintenance. Many homeowners ask, how do I install hardwood floors to avoid warping or gaps? These planks are less prone to expanding or contracting with humidity changes. Floating, glue-down, and nail-down methods offer flexibility depending on subfloor type and room requirements. Preparing the subfloor with moisture barriers enhances the performance of the engineered hardwood flooring installation. Thoroughly cleaning the surface keeps dirt and debris from creating uneven areas. Allowing the planks to acclimate to room conditions before installation prevents gaps or buckling later. Professional flooring installation services often recommend leaving a 1/2-inch expansion gap around the room edges. These small details ensure the floor remains flawless over time. Essential Tools for Hardwood Flooring Proper tools make a huge difference during hardwood floor installation. Many homeowners ask, how do I install hardwood floors correctly without making costly mistakes? A high-quality saw ensures precise cuts for corners and doorways. Tapping blocks and pull bars help snug planks together without damaging the edges. Using spacers maintains consistent expansion gaps around walls for smooth performance. Using a moisture meter is crucial to check the subfloor before installing hardwood. This step prevents problems caused by excess humidity or dampness under the planks. Choosing the correct adhesive or nails depends on the installation method selected. Flooring installation services often advise checking each plank for defects before securing it. These precautions save time and avoid expensive mistakes later. Choosing Hardwood Floor Installation Patterns Selecting the right hardwood floor installation patterns adds character and uniqueness to rooms. Many homeowners ask, how do I install hardwood floors with patterns like herringbone or straight lay? Straight lay is simple and classic, suitable for most spaces. Herringbone or chevron patterns create a more luxurious and dynamic visual effect. Diagonal installation can make smaller rooms appear larger and brighter. Mixing plank widths enhances texture and provides a contemporary look in living areas. Planning the pattern ahead reduces cutting errors and ensures consistent spacing. Homeowners should review tutorials or consult professionals for pattern advice. Using a quality measuring tape and chalk line ensures precision during layout. Flooring installation services can assist in complex pattern execution for perfect results. Finishing Hardwood Floors Finishing hardwood floors protects the surface and enhances beauty. Many homeowners ask, how do I install hardwood floors and properly finish them for long-lasting results? Sanding before staining creates smooth, even surfaces for optimal results. Applying stain or sealant according to manufacturer instructions ensures durability and color consistency. Polyurethane coatings prevent scratches, water damage, and daily wear. Ensuring good ventilation while finishing prevents fumes and speeds up drying. Buffing between coats enhances the floor’s smoothness and natural shine. Cleaning tools and brushes immediately prevents residue buildup and extends their usability. Regular maintenance, such as sweeping and damp mopping, keeps the floor looking new. Flooring installation services often include post-installation care instructions for homeowners. Maintaining Hardwood Floors Proper care for hardwood floors helps them last longer and stay beautiful. Many homeowners ask, how do I install hardwood floors and maintain them for lasting results? Place felt pads under furniture to prevent scratches and dents. Keep water off the surface and avoid wet mops, as moisture can harm the wood. Periodic refinishing restores shine and fixes minor imperfections efficiently. Humidity control with humidifiers or dehumidifiers prevents warping during seasonal changes. Inspect floors regularly for gaps, squeaks, or loose planks, addressing issues promptly. Using mild cleaning products ensures the finish remains intact and vibrant. Homeowners can combine DIY care with periodic professional flooring installation services for optimal results. Proper attention to maintenance keeps hardwood floors flawless for decades. Conclusion Installing hardwood floors is a smart investment that brings lasting beauty and strength. Learning how do I install hardwood floors properly ensures a professional finish at home. Choosing the right wood type, subfloor preparation, and correct tools all contribute to success. Considering engineered hardwood flooring installation and various flooring patterns enhances aesthetics and stability. Following precise techniques and maintaining the floor afterward maximizes longevity and appeal. Homeowners who follow these steps enjoy comfortable, stylish living spaces with minimal hassle. Professional flooring installation services can provide guidance, expertise, and even a free estimate, guaranteeing perfect floors every time. Proper planning and care make hardwood floors a lifelong enhancement to any home.
Hardwood Flooring on Stairs | A Complete Guide
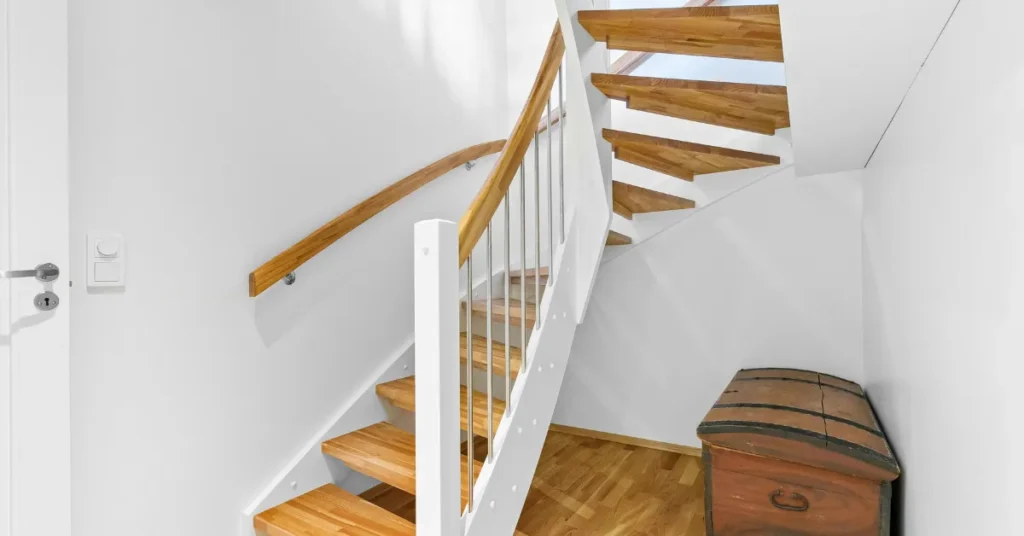
When homeowners think of upgrading their home style and safety, hardwood flooring on stairs becomes a highly popular option for durability and design appeal. Many people admire the natural beauty and timeless style that hardwood brings to any living space. Installing hardwood on stairs improves not only looks but also makes maintenance easier compared to carpets. With the right approach, hardwood floor stairs add long lasting charm and function. A well done installation ensures safety, value, and elegance for families. Professional hardwood flooring installation services provide the skills needed for perfect results every time. Homeowners who choose hardwood are making an investment that can increase their property value instantly while improving daily comfort. Benefits of Hardwood Floor Stairs Over Other Options Hardwood floor stairs are often chosen because they are strong and stylish. Unlike carpet, hardwood is much easier to clean and lasts longer with less effort. Families find hardwood stairs practical, especially when combined with modern railing designs and lighting. Understanding how do you install hardwood flooring on stairs is important before beginning any project. Professional contractors usually use the best hardwood flooring installation tools for a clean and safe finish. They prepare the stairs carefully, removing old flooring before starting new work. Once the steps are smooth, boards are cut and fixed tightly with adhesive and nails. Hiring professional hardwood flooring installation services ensures both quality and safety. Many homeowners consider hardwood floors and stairs as a long term solution. The Process of Installing Hardwood Floor Stairs Installing hardwood floor stairs requires attention to every detail and measurement. Every tread and riser must be measured carefully before fitting the wood planks. Professional installers make sure each piece matches the stair layout perfectly. They also use hardwood flooring installation tools that give accurate cuts and clean finishes. Some homeowners ask how do you install hardwood flooring on stairs without help. While it is possible as a do it yourself project, it takes skill and patience. A professional team saves time and prevents common mistakes during the process. For those considering other options, many companies also offer vinyl installation and tile floor installation services, giving flexibility in style and budget. Still, hardwood remains a premium and reliable choice. Durability and Safety Features of Hardwood Stairs The benefit of hardwood floor stairs goes beyond appearance and resale value. Hardwood is resistant to daily foot traffic, making it reliable for busy households. Unlike carpets, hardwood does not trap dust or allergens, which improves indoor air quality. Hardwood floors and stairs are especially great for families with pets, since scratches can often be refinished instead of replacing. A professional hardwood flooring installation service also ensures safety by adding stair nosing for better grip. Many wonder how do you install hardwood flooring on stairs safely. The answer is by using proper adhesives, correct fasteners, and finishing techniques. Contractors bring professional knowledge, high quality hardwood flooring installation tools, and careful craftsmanship to ensure long lasting results. Design Options with Hardwood Floor Stairs Choosing hardwood floor stairs also offers design flexibility for every home style. Homeowners can select from light oak, rich cherry, or modern walnut finishes. Each choice adds a unique feel that complements interior design themes. Professional hardwood flooring installation services help clients choose wood types that fit lifestyle and budget. For example, a busy family may choose a harder species to resist scratches and dents. While some people explore vinyl installation for affordability, hardwood always delivers classic and elegant results. Tile floor installation services are another alternative, but they can feel colder and less inviting than hardwood. With proper care, hardwood stairs will continue to look beautiful for decades, making them a smart home upgrade. Why Professional Hardwood Flooring Installation Services Matter When planning hardwood floor stairs, homeowners should always consider professional installation over self projects. Even with the right hardwood flooring installation tools, mistakes are easy without experience. Professional hardwood flooring installation services ensure that every stair is even and secure. They also apply finishing coats to protect wood from moisture and wear. Homeowners often ask how do you install hardwood flooring on stairs while keeping costs low. Hiring professionals may seem expensive at first but prevents future repairs. Hardwood floors and stairs are an investment in both safety and property value. Compared to vinyl installation or tile floor installation services, hardwood provides timeless charm that never goes out of style. Families enjoy safe, stylish, and lasting results with professional guidance.
Carpet Edge Binding Explained | Installation and Benefits
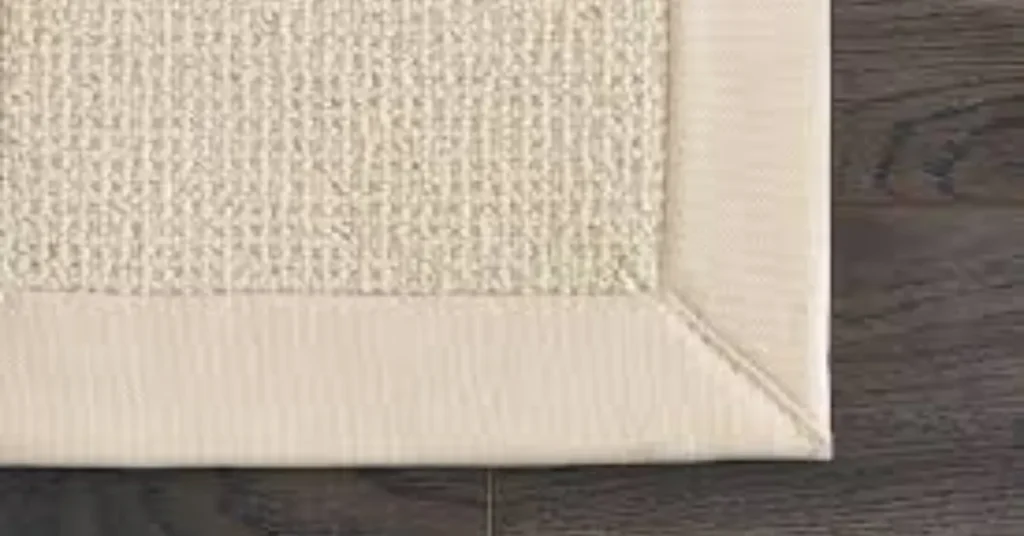
Carpet edge binding is an important part of creating a polished look for any room. Many homeowners often overlook how proper finishing can affect the longevity of their carpets. Without a clean edge, carpets may fray or curl over time, leading to uneven wear. Professional carpet installation includes finishing the edges with durable binding materials. This process ensures the carpet stays flat and maintains its shape for years. Additionally, carpet edge binding adds a refined appearance, making the room feel complete. Whether installing new carpet or customizing area rugs, binding provides stability. Homeowners appreciate the extra care it offers. Proper binding protects investment and enhances room aesthetics. Area rug finishing adds value and ensures edges last longer. How Carpet Edge Binding Improves Durability Carpet edge binding improves the durability of all carpet installations in homes. The binding process involves sewing or gluing a special tape around carpet edges. This extra layer prevents fraying and separates fibers from pulling apart. It also strengthens corners and irregular shapes, ensuring longevity. Many interior designers recommend binding for both style and practicality. Custom carpet installation ensures accurate measurements and perfect fits every time. Professional installers use precision tools to guarantee a neat edge. In high-traffic areas, binding reduces wear and tear on carpet edges. Choosing quality materials for binding enhances overall carpet lifespan and appearance. Homeowners enjoy a clean, modern look after installation. The Installation Process for Carpet Edge Binding The installation of carpet edge binding requires skill and attention to detail for best results. Installers measure the carpet carefully before attaching binding material along all edges. Different types of binding, such as fabric, vinyl, or serged, are available. Each type offers specific benefits depending on carpet thickness and usage. Residential carpet installation is often recommended for high-traffic areas or custom room sizes. Proper binding ensures the carpet lies flat and edges remain secure. This also helps prevent tripping hazards from curling edges. Homeowners often notice the difference in appearance immediately. The installation process may vary slightly based on carpet type. Professionals recommend binding for all newly installed carpets. Aesthetics and Safety Benefits of Carpet Edge Binding Carpet edge binding enhances both aesthetics and safety in homes or offices. Without binding, carpet edges can fray, creating uneven surfaces over time. Safety is improved when edges are finished properly and remain stable underfoot. Residential carpet installation improves both comfort and style throughout a home. Binding is especially important for high-traffic rooms or areas with frequent foot traffic. Properly finished edges make cleaning easier and prevent premature wear. Homeowners find that rooms appear more polished and cohesive after binding. Edge finishing contributes to a more luxurious look for any interior design. Choosing professional installation ensures that binding is done evenly and securely. Maintenance Tips for Carpet Edge Binding Maintenance of carpet edge binding is simple but important for longevity and beauty. Regular vacuuming and gentle cleaning preserve both carpet fibers and binding materials. Avoid dragging heavy furniture across edges to prevent loosening or fraying. Carpet flooring services often include guidance on proper care for installed carpets. Inspect binding periodically for signs of wear or damage, and address issues promptly. Some homeowners prefer to rebind edges during carpet replacement for fresh appearance. Properly maintained carpet binding saves money by reducing the need for carpet replacement. It also maintains a neat, professional look throughout the home. Quality installation combined with routine care ensures durability for many years. Long-Term Benefits of Carpet Edge Binding Benefits of carpet edge binding go beyond appearance and protection of carpets. Binding improves longevity, strengthens edges, enhances safety, and provides a professional finish. Hardwood and carpet flooring often benefit from professionally finished edges and binding. Area rugs or wall-to-wall carpet installations benefit significantly from binding services. Many homeowners report increased satisfaction with the overall look and performance of carpet. Professional binding increases property value by maintaining pristine flooring aesthetics. Binding also allows for easier replacement or custom fitting when necessary. It is an affordable service with long-term advantages. Properly installed carpet edges demonstrate attention to detail and quality workmanship. Conclusion: Why Carpet Edge Binding is Essential In conclusion, carpet edge binding is an essential part of professional carpet installation. It ensures durability, enhances appearance, and increases safety for homeowners. Luxury vinyl and carpet installation are complemented by properly finished edges. Installing binding is a simple step that delivers long-term advantages for any room. Homeowners should always consider professional services to guarantee proper installation. Quality materials and careful finishing create a polished, modern look for carpets. Proper binding protects investments, saves money, and maintains aesthetic appeal. With regular maintenance, carpet edge binding can last the entire life of the carpet. Choosing expert installers ensures clean, secure, and visually pleasing edges.
Vinyl Flooring Installation | Step-by-Step Guide for Homeowners
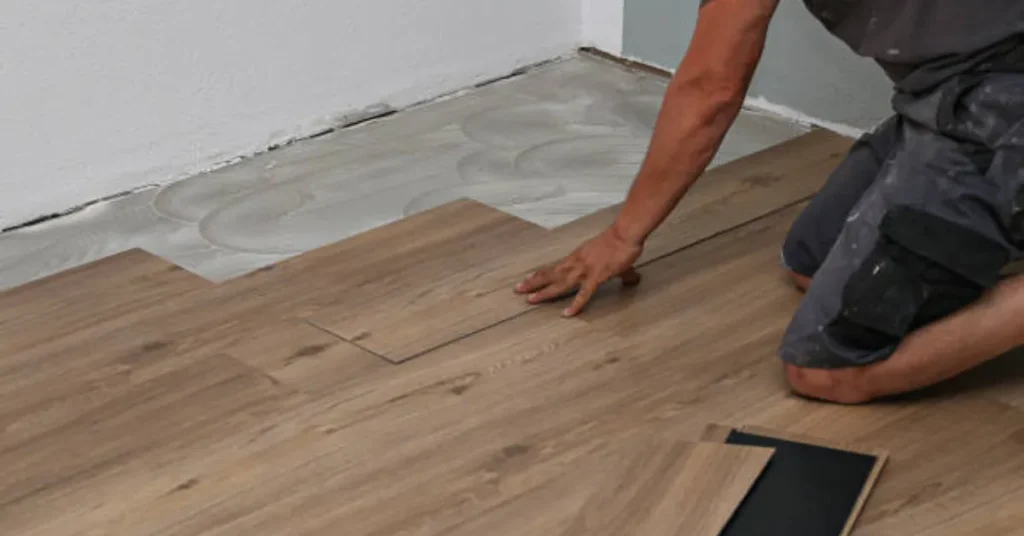
A new floor can transform both the look and vibe of your living space. Vinyl installation flooring is one of the easiest and most durable options to consider. Many homeowners prefer it because it resists moisture, is easy to clean, and comes in many styles. If you want to improve your living space efficiently, knowing how to install vinyl plank flooring is essential. This guide will provide detailed steps, tips, and tricks to make your installation smooth. From understanding patterns to preparing surfaces, you can enjoy professional results without hiring a contractor. Let’s explore the process carefully. Preparing Tools and Materials Before you start, you must gather all tools and materials needed. A tape measure, utility knife, spacers, underlayment, and vinyl planks are essential. Always read manufacturer instructions for specific requirements. Preparing the subfloor correctly helps the planks stick and last longer. Make sure it is clean, dry, and level before proceeding. If you plan on installing vinyl plank flooring in a bathroom, extra moisture precautions are required. You may need a waterproof underlayment to prevent water damage. Learning how to install vinyl plank flooring correctly starts with proper preparation. Many homeowners also consider professional installation services for precise and lasting results. Planning Your Vinyl Flooring Layout Begin by planning your layout for the vinyl planks in each room. Decide which direction to install vinyl plank flooring for the best visual effect. Typically, planks run parallel to the longest wall for a spacious feel. Avoid random placement as it may create an uneven appearance. Measure your space carefully to minimize small cuts at edges. Consider the installation patterns for vinyl plank flooring that suit your design. Staggering planks or creating a brick pattern adds natural appeal. Planning is critical to ensure your attempt to install vinyl plank flooring is successful. Laying the Vinyl Planks Start laying the vinyl planks from a straight reference line along the wall. Keep a small gap between the wall and planks for natural expansion, using spacers to keep it even. Connect each plank by locking it into place according to manufacturer instructions. Push down on each plank to secure it to the subfloor. Avoid forcing planks as it may damage edges. For bathrooms or damp areas, ensure the first row is properly sealed. Properly learning how to install vinyl plank flooring ensures a neat and lasting finish. Cutting Vinyl Planks for Edges and Corners Cutting vinyl planks for edges or corners is simple with a utility knife. Measure the required length carefully to avoid mistakes. Measure, score, and snap the plank to create a clean edge. Keep scrap pieces to test fit other areas before final installation. Using a straightedge helps achieve precise cuts every time. When installing around obstacles like vents or cabinets, measure twice to ensure proper fit. Smooth out any rough edges to prevent uneven joints. Cutting accurately is a vital step when you install vinyl plank flooring yourself. Finishing Touches After laying the main floor area, focus on finishing touches and details. Remove all spacers, then install baseboards to cover the expansion space. Inspect the floor for misaligned planks or minor gaps. Clean the surface thoroughly with a soft broom or vacuum. Avoid using harsh chemicals that could damage vinyl flooring. If desired, you can add floor protectors under furniture legs. This helps prevent scratches and extends floor life. Following the correct steps while you install vinyl plank flooring ensures professional-looking results. Maintaining Your Vinyl Floor Maintenance is essential for keeping vinyl flooring beautiful for years. Regular sweeping and occasional damp mopping remove dirt and debris effectively. Avoid excess water, especially in areas where water may accumulate. Installing vinyl plank flooring in a bathroom requires careful moisture management. Use mats near sinks and showers to protect edges. Stay away from harsh cleaners that could harm the floor’s finish. Periodically check for lifting or gaps and address them quickly. Proper care after you install vinyl plank flooring extends the life of your investment. Final Tips for Successful Installation Vinyl flooring installation can be completed successfully with patience and proper planning. By understanding how to install luxury vinyl tile flooring, homeowners achieve professional results. Paying attention to installation patterns, layout direction, and moisture areas ensures success. Following manufacturer guidelines and precise cutting techniques prevents future issues. With these steps, any homeowner can enjoy a modern, durable, and easy-to-maintain floor. Whether renovating a kitchen, bathroom, or living area, vinyl planks provide beauty and resilience. Remember, careful preparation is key whenever you install vinyl plank flooring in your home.
How We Replaced Our Upstairs Carpet | Step-by-Step Guide
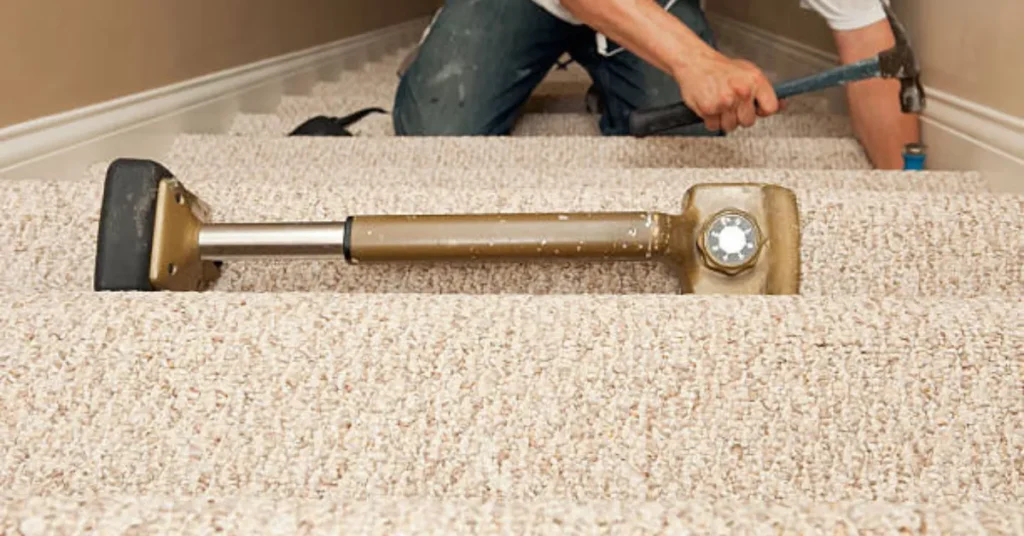
Replacing your upstairs carpet can seem like a big task, but it is achievable. Many homeowners worry about the process, yet with proper guidance, it can be smooth. Our experience taught us patience, planning, and the correct tools to complete the job successfully. We decided to share our journey to help others who are curious about home upgrades. In this guide, you will learn everything about how to replace carpet on stairs safely.This guide helps you cut down on time, costs, and unnecessary stress. By the end, you can confidently manage residential carpet installation or even commercial carpet installation projects at home. Planning and Preparing for Carpet Replacement Before starting, planning is essential for a successful carpet replacement. If you’re learning how to replace carpet on stairs, the first step is to measure each stair carefully to determine how much carpet you will need. Gather necessary tools like a utility knife, staple remover, carpet tack strips, and a knee kicker. Clear the stairs completely, removing any furniture or decorations that may obstruct work. If you consider replacing carpet on stairs with wood or laminate, plan for extra time and preparation. Understanding whether you want professional carpet installation or DIY will influence your approach. Knowing how often to replace carpet depends on traffic and wear, so keep your schedule realistic for maintenance purposes. Proper preparation ensures smooth workflow and efficient results. Removing Old Carpet Safely Start by loosening the edges of old carpet with a utility knife. Pull the carpet carefully from each stair, starting at the top and moving downward. Be sure to remove every staple, nail, and tack strip for a smooth base. Cleaning the stair base before installing new carpet prevents bumps or damage later. Before installing laminate in place of carpet, check that the subfloor is even, stable, and moisture-free. Avoid rushing this step, as skipping can result in uneven installation. When learning how to replace carpet on stairs, paying attention to detail during removal is just as important as installation. Residential carpet installation requires precision for safety and aesthetics, while commercial carpet installation also benefits from thorough preparation to ensure a polished, professional finish. Proper removal makes new installation easier and more effective. Cutting and Measuring New Carpet Measure each stair individually, accounting for risers and treads accurately. Cutting carpet precisely prevents waste and ensures a perfect fit. If replacing carpet on stairs with wood or laminate, measure carefully for smooth transitions. Use chalk lines to guide straight, even cuts. Trim edges slightly larger than the stair dimensions to allow adjustments. Keep in mind that professional carpet installation often involves templates for accuracy. Double-check measurements before cutting to reduce errors. When learning how to replace carpet on stairs, remember that accuracy is essential whether you choose carpet or laminate. Precise cuts allow easy fitting, less stretching, and long-lasting results. Always plan for small trimming adjustments during installation. Installing Carpet on Stairs Begin by laying tack strips along the edges of each stair. Press the carpet onto the strips, ensuring firm adhesion without wrinkles. Stretch the carpet using a knee kicker to make it tight and smooth. Staple or secure the carpet along risers to prevent movement. For replacing carpet on stairs with wood or laminate, additional padding or adhesive may be required. Follow manufacturer instructions for best results. Residential carpet installation should maintain consistent tension for safety and appearance. Commercial carpet installation requires durable methods to handle higher foot traffic. Proper installation ensures longevity, comfort, and a polished look across all stairs in your home or office space. Finishing Touches and Maintenance Tips Once installed, carefully trim away any excess carpet with a utility knife. Tuck edges neatly along walls and corners for a professional finish. Vacuum thoroughly to remove dust, fibers, and debris from cutting. Place stair protectors if needed to prolong carpet life and reduce wear. How often to replace carpet depends on foot traffic, pets, and overall usage. If considering replacing carpet with laminate flooring, maintain the same care routines to extend lifespan. Regular cleaning and inspection enhance durability. Professional carpet installation guarantees proper finishing techniques, but DIY efforts can also succeed with patience. By following these maintenance tips along with our guide on how to replace carpet on stairs, your upstairs stairs will remain safe, attractive, and comfortable for years. Conclusion Replacing upstairs carpet may seem challenging initially, yet it is achievable with planning. Our step-by-step guide demonstrates how to replace carpet on stairs efficiently. From preparation and removal to measuring, cutting, and installation, each step is essential. Consider professional carpet installation service for faster results, or follow our guide for DIY satisfaction. Replacing carpet on stairs with wood or laminate is also an option for modern home upgrades. Proper maintenance, regular inspection, and knowing how often replace carpet will prolong the investment. Whether residential carpet installation or commercial carpet installation, following these steps ensures excellent results. Your stairs will look fresh, clean, and professionally finished after completion.
How to Safely Remove Old Carpet Before Installing a New One
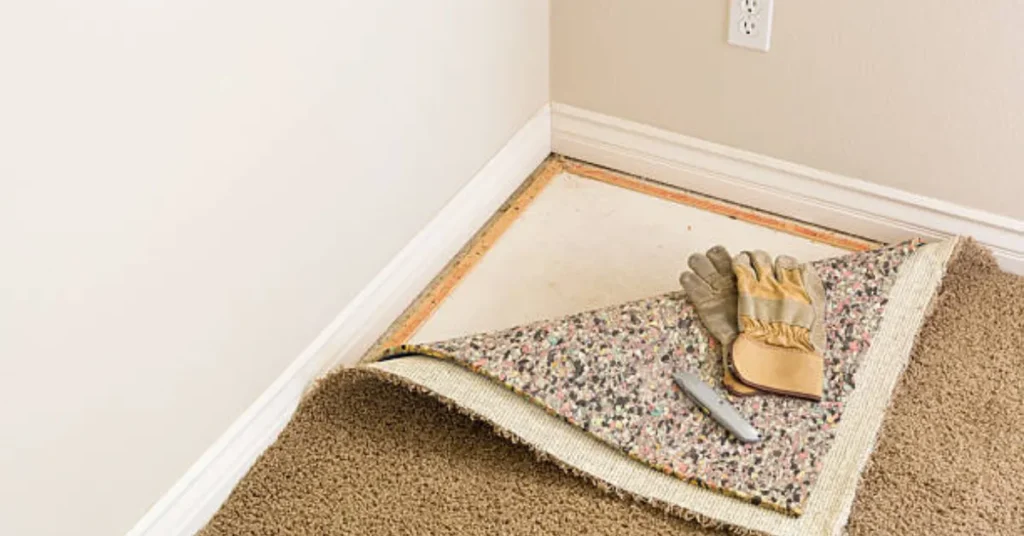
Preparing Your Room for Carpet Removal Removing old carpet can feel like a big project, but with proper planning, it becomes simple and safe. Many homeowners wonder, should I tip carpet installers when hiring help, especially after a thorough removal and installation? Asking this question helps maintain professional relationships and ensures your workers feel appreciated. Preparing the room before carpet removal includes clearing furniture, checking for nails or staples, and gathering essential tools like pliers, utility knives, and gloves. Safety is essential, and wearing protective gear prevents injuries during carpet removal. Removing carpet carefully helps maintain the flooring underneath and avoids costly damage. Step-by-Step Carpet Removal Process After clearing the room, carefully cut the carpet into manageable sections. Pulling the carpet away from the tack strips along the walls is essential for smooth removal. Keep in mind, asking should I tip carpet installers’ is common, especially when they handle old, tough carpet. Use pliers to remove staples and nails that hold the carpet in place. Roll the carpet tightly for easy disposal. Carpet padding also needs removal and can sometimes stick to the floor with adhesive. Proper disposal of old carpet and padding prevents environmental hazards and keeps your home clean. Inspecting and Preparing the Subfloor Next, inspect the subfloor for damage or stains that may require attention. Fixing small cracks or replacing damaged sections ensures the new carpet lays evenly and lasts longer. Many homeowners ask, how long does it take to install carpet after removing the old one? While timing depends on room size, thorough subfloor preparation often makes installation faster and smoother. It’s important to clean the subfloor to get rid of dust and debris. A clean subfloor helps professional carpet installation services achieve a perfect finish. For high-traffic areas, checking for water damage or mold is particularly important to prevent future problems. Removing Carpet from Stairs If you are installing carpet on stairs, extra care is needed during removal and preparation. Stairs often have tight corners and additional nails or staples that require careful handling. Should I tip carpet installers when they manage stair removal is another common question, especially for complex layouts. Using a knee kicker or specialized stair tools can make the process safer. Measuring each step before installing new carpet ensures an accurate fit. Proper stair preparation prevents carpet wrinkles and improves durability. For homeowners with both stairs and rooms, considering professional carpet installation services saves time and guarantees quality. Residential and Commercial Carpet Installation Considerations For those considering new carpet, choosing between residential and commercial carpet installation matters. Residential spaces may focus on comfort and style, while commercial carpet installation often prioritizes durability. Carefully removing old carpet gets the floor ready for any new installation. Carpet replacement services can handle everything from old carpet removal to installation, making the process stress-free. Many homeowners still ask, do you tip carpet installers for such comprehensive services? Showing appreciation builds good rapport and motivates professionals to maintain high standards. Planning the project carefully reduces unexpected costs and ensures long-lasting results for all carpet types. Tips for Safe Carpet Removal During removal, pay attention to the edges and corners, where damage is most likely. Pulling carpet too aggressively can damage baseboards or flooring underneath. Should I tip carpet installers is important if workers go the extra mile to protect walls and trim. Cutting stubborn sections with a utility knife and removing staples with pliers keeps the subfloor clean. Once old carpet and padding are removed, vacuuming the area thoroughly prepares it for the new installation. A clean floor surface ensures residential carpet installation looks professional and lasts for years. Installing Your New Carpet Finally, when installing new carpet, careful planning saves time and prevents mistakes. Carpet replacement services often suggest measuring rooms accurately and choosing the correct padding. Should I tip carpet installers depends on factors like room size, effort, and professionalism. Installing carpet on stairs may require additional attention to fit and secure edges. Professional carpet installation services follow these steps to guarantee satisfaction. For commercial carpet installation, ensuring the workspace is prepared and safe is equally critical. By taking these measures, you protect your investment and enjoy a smooth, successful carpet installation experience. Conclusion By following these steps, removing old carpet before installing new flooring becomes manageable and safe. Knowing how to handle the process and whether to show gratitude to workers is equally important. Asking should I tip carpet installers shows respect for professional service and ensures smooth cooperation. Whether handling stairs, large rooms, or commercial spaces, proper removal techniques and careful preparation set the foundation for long-lasting carpet. Using professional carpet installation services or doing it yourself, understanding each step guarantees satisfaction. Careful planning, safety, and attention to detail lead to a clean, durable, and beautifully installed carpet in your home or business.